
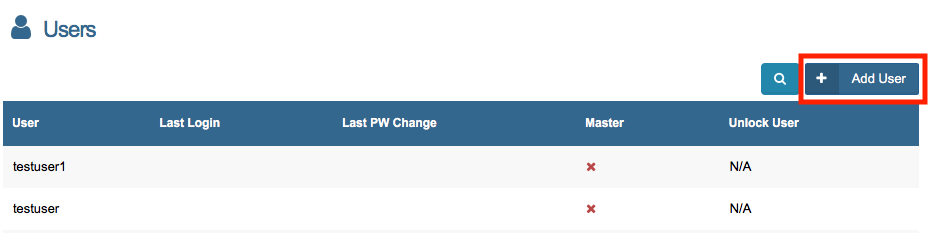
Settings: Users

The user settings page allows you to add and edit users on your reseller account. Each user can have their own password and individual settings and permissions ranging from Master Account (full access) to whatever limited access is appropriate.
Add User
To add a user to your account, click on the Add User button.
User Info
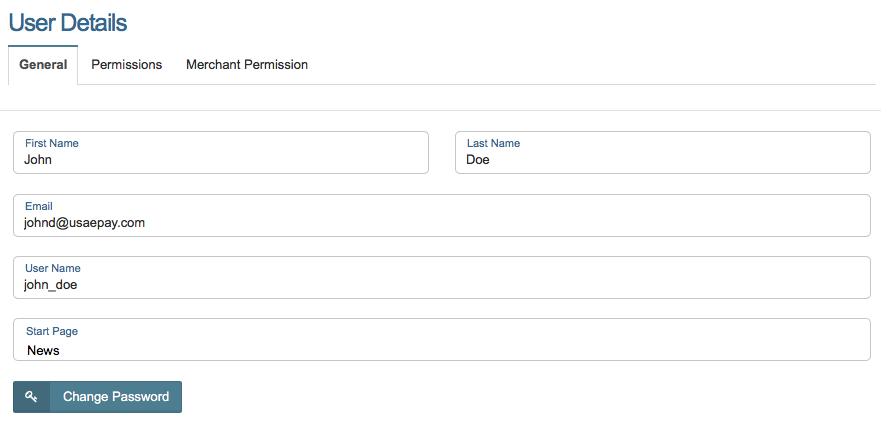
Enter a first and last name, email, username and password for the new user. The first time the new user logs in to the system, he or she will be asked to change their password, so the initial password can be something fairly simple, although it must still conform to industry regulations regarding length (at least 8 characters) and variety (combination of numbers and letters).
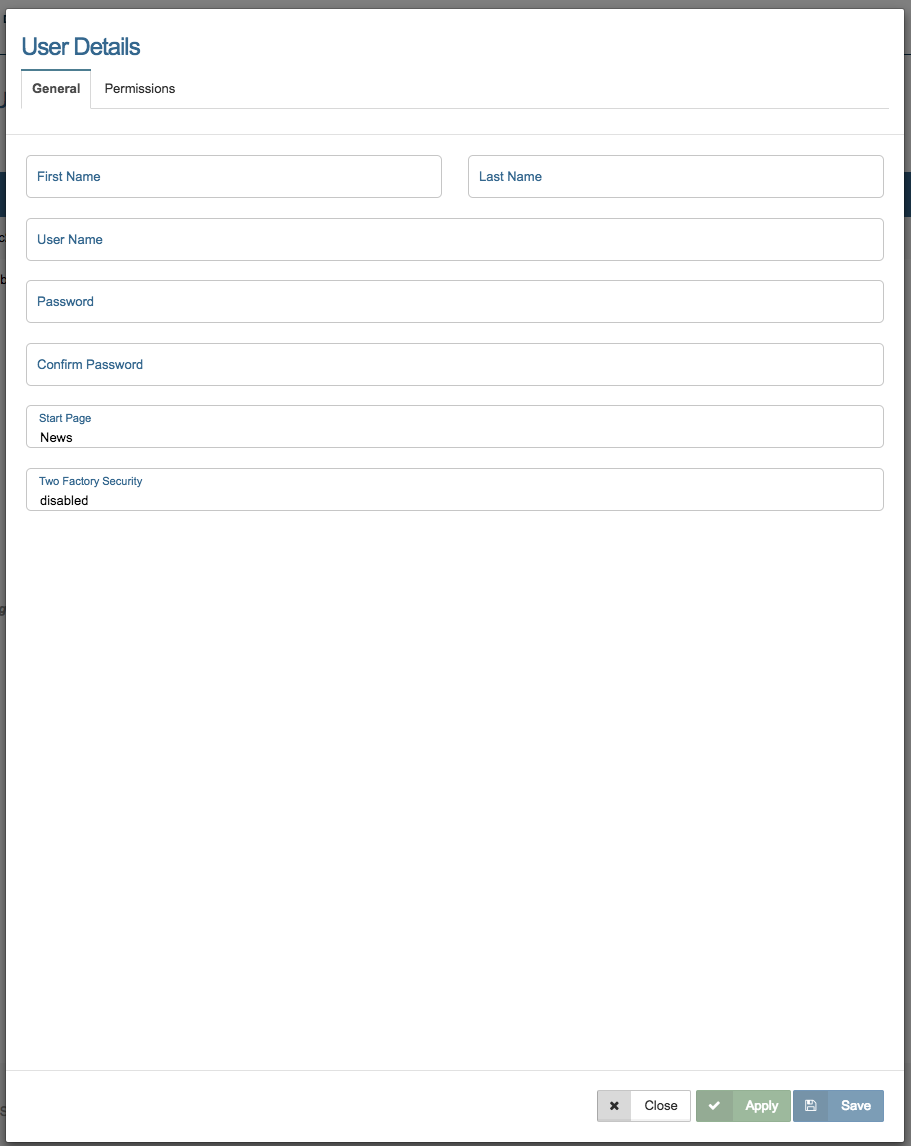
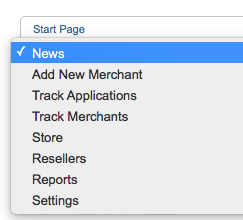
Then select a start page for the user from the drop down menu. The default start page is the News/Home page, but you can select Add New Merchant, Track Applications, Track Merchants, Store, Resellers, Reports, or Settings.
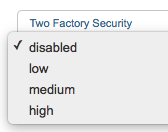
Next, you can prompt the user to set up two-factor authentication when they login. To prompt the user to set up two factor authentication choose the desired security level in the drop-down menu.
Reseller Permissions
Next, navigate to the Permissions tab to select the functions you would like that user to have access to. Checking the Master Account box will give the user access to all features of the reseller console, including adding and editing other user accounts, adding and editing sub resellers, settings, fraud prevention modules and passwords.
You can also select only certain functions for the user such as the ability to explore Active Merchants.
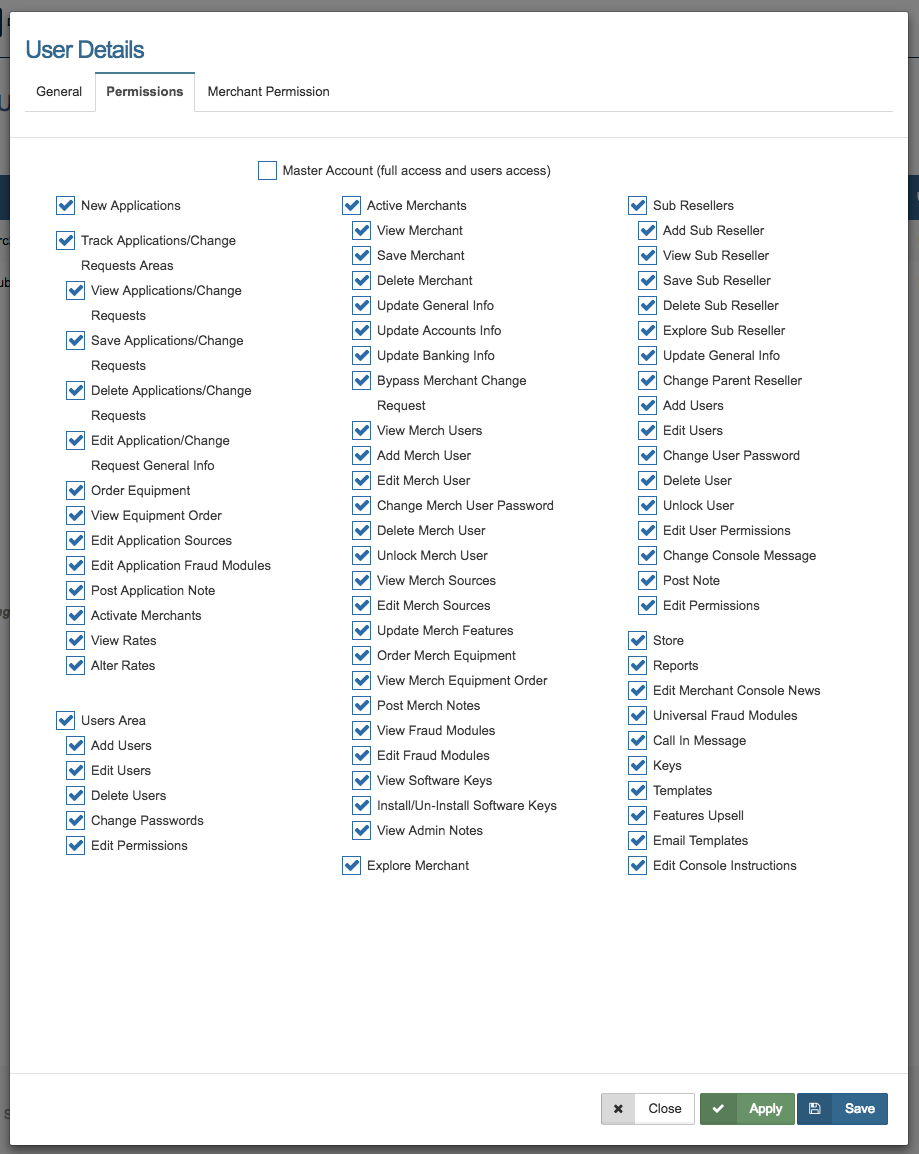
You can set the user's permissions to include most or only a few of the Master Account functions. Click the functions you would like the user to be able to use.
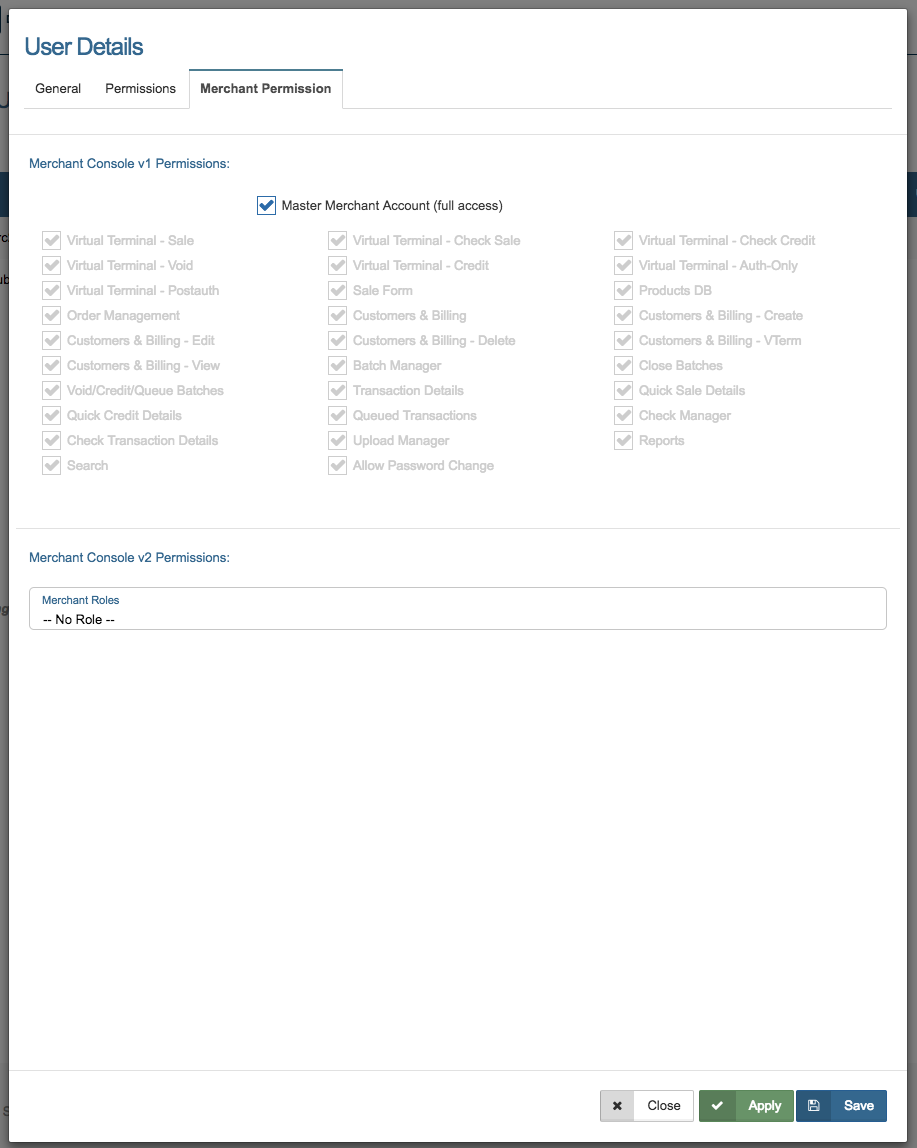
Explore Merchant Permissions
If you do allow the user to explore active merchants, a third tab will be shown called Merchant Permissions. In this tab, choose what permissions you would like the user to have access to while exploring active merchant accounts.
Last, save the new user. If necessary, you will be able to come back and change the user's permissions in the future.
Edit User
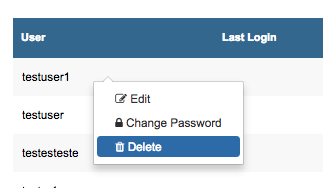
By right clicking on the user you will be able to change that user's username, start page and permissions. You can also select Change Password to reset the users password.

You can also just click on the user directly to get to the edit user screen.
Once you have updated the user settings, click Save.
Delete User
To delete a user, simply right click on the username and select Delete in the dropdown.
You will be asked to confirm the deletion.
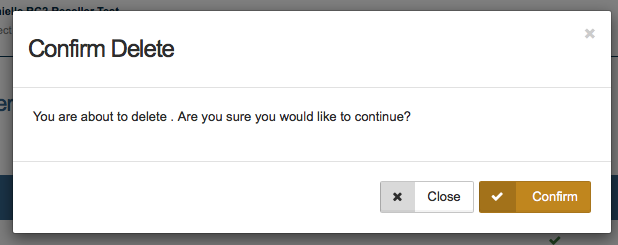
Click Confirm to delete the user and return to the User Settings screen or Cancel to return to the User Settings screen without deleting the user's account.
Change Password
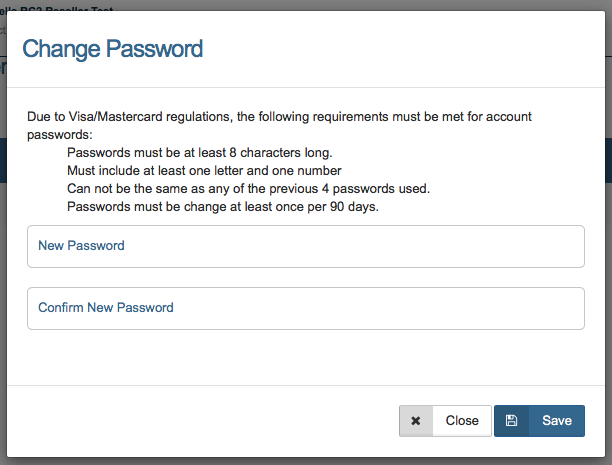
To reset a user passowrd, simply right click on the username and select Change Password in the dropdown. Enter and confirm the new password in the space provided. You do not have to provide the user's old password in order to assign them a new one.
In accordance with Visa/Mastercard regulations, all passwords must meet the following conditions:
- Passwords must be at least 8 characters long.
- Passwords must include at least one letter and one number.
- Passwords cannot be the same as any of the previous 4 passwords used.
- Passwords must be changed at least once per 90 days.
When selecting a password remember that the strongest passwords are between 8 and 14 characters and should include a random combination of letter, numbers and symbols.
Two Factor Authentication
Two-Factor authentication is a way to keep your user account safe by requiring 2 forms of identification before logging in. The first will be your user name and password, and the second will be one of the following:
We require you set up 2 methods that can be used as your second authentication method, but you can set up all of the above options if you would like.
Configuring Two Factor
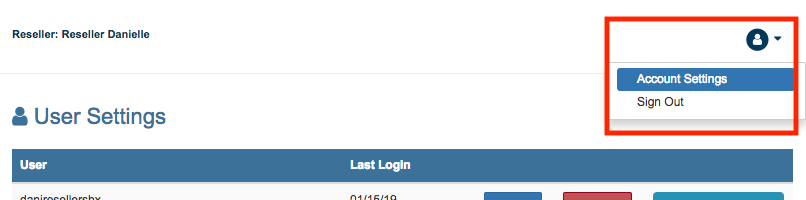
To enable two factor authentication go to the user settings in upper righthand corner and click Account Settings.
Click the "Manage Authentication Methods" button to enable one or more authentication methods.

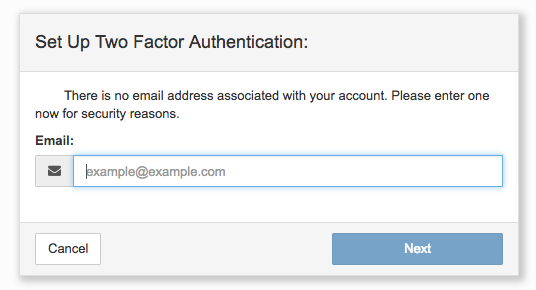
If the user does not have an email address associated with the username, it will ask you to add an email:
Once you have entered an email address or if there is already an email associated with the user, you will then be prompted to set up their other factors.
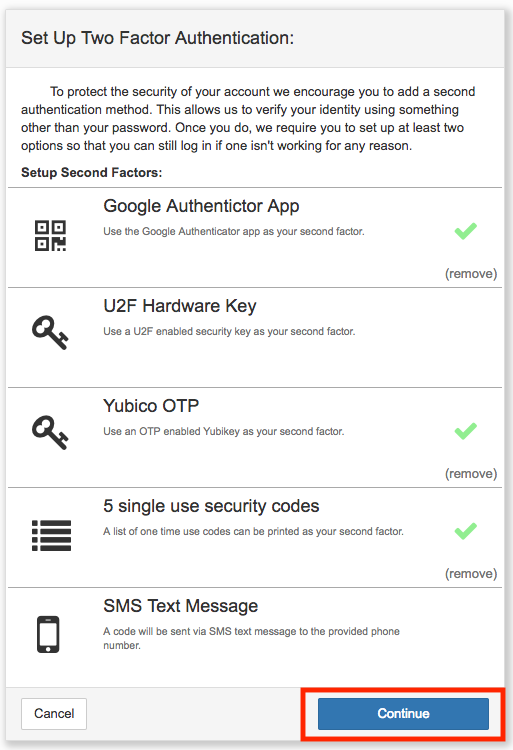
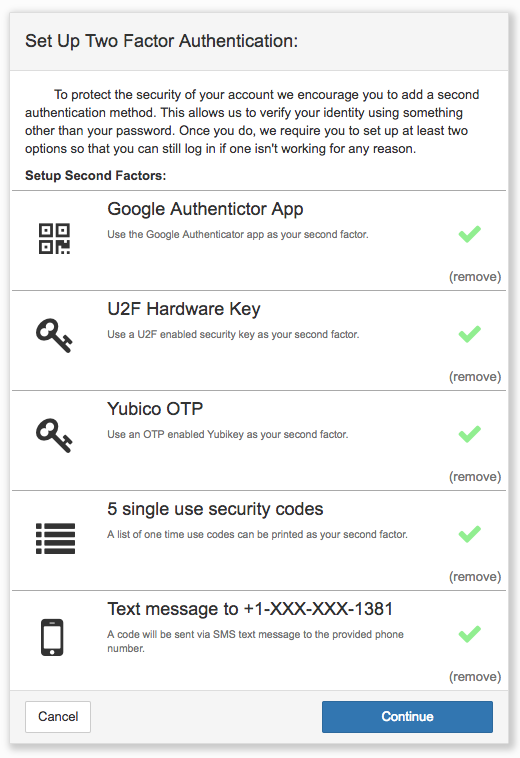
Available Methods
The user can set up two or more factors. They can choose from the following methods:
- U2F Security Key- Verify identity using a hardware token. (U2F is not supported on all browsers. If the browser you are using does not support U2f, then this option will not appear)
- Yubico OTP- Verify identity using a one time password hardware token.
- Google Authenticator- Verify identity via google authenticator app.
- One Time Use Codes- Verify identity using a one time use verification code.
- SMS Text Message- Verify your identity via SMS text.
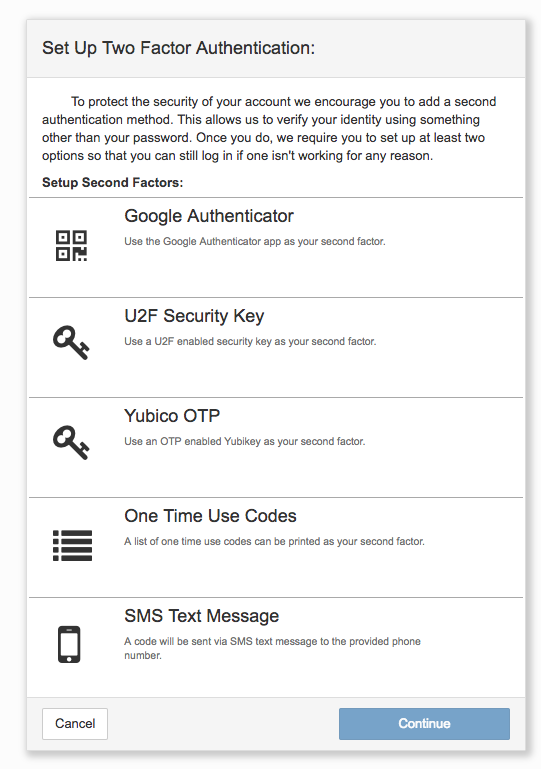
You can set up all methods, or just the two required. Click on whichever method you would like to set up.
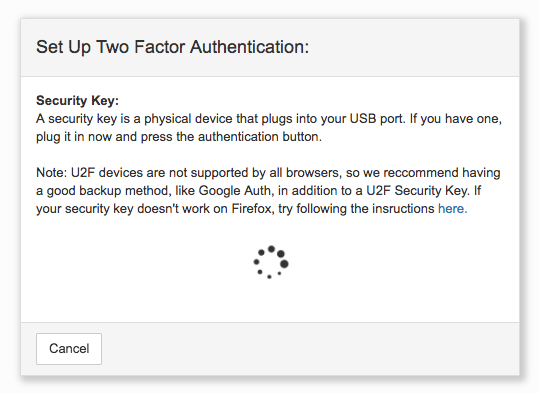
U2F Security Key
A security key is a physical device that plugs into your USB port. To use a hardware key, you must first purchase one. They can be found here.
Browser Compatibility
U2F hardware keys are not compatible with all browsers and this option will not be displayed if the browser is not compatible. U2F security keys will only work in Google Chrome by default. They can also be used in Firefox, but you will need to set up your browser to be able to use it. Click here for instructions on updating Firefox settings to work with U2F security keys.
Once you have purchased the hardware key and are using a compatible browser, plug in the U2F hardware key into your computer and click U2F Hardware Key. When you see the screen below, tap the authenticate button on the hardware key:
If the set up is successful, you will be returned to the Two Factor Set-Up screen and will see a green check to the right of the method.
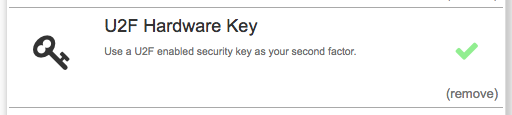
An email will also be sent to the user email confirming an authentication method has been added.
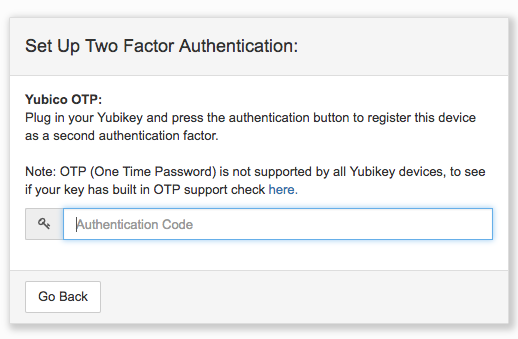
Yubico OTP
A security key is a physical device that plugs into your USB port. To use a hardware key, you must first purchase one. They can be found here. Please Note: OTP (One Time Password) is not supported by all Yubikey devices, to see if your key has built in OTP support check here.
Once you have purchased the hardware key, plug in the OTP hardware key into your computer and click Yubico OTP. When you see the screen below, tap the authenticate button on the hardware key:
If the set up is successful, you will be returned to the Two Factor Set-Up screen and will see a green check to the right of the method.
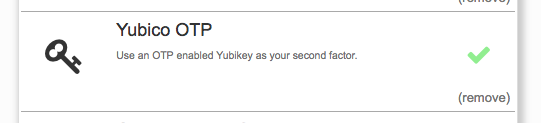
An email will also be sent to the user email confirming an authentication method has been added.
Google Authenticator
To set up two factor through Google Authenticator, you will first need to download the app. It is FREE and can be found at the links below:
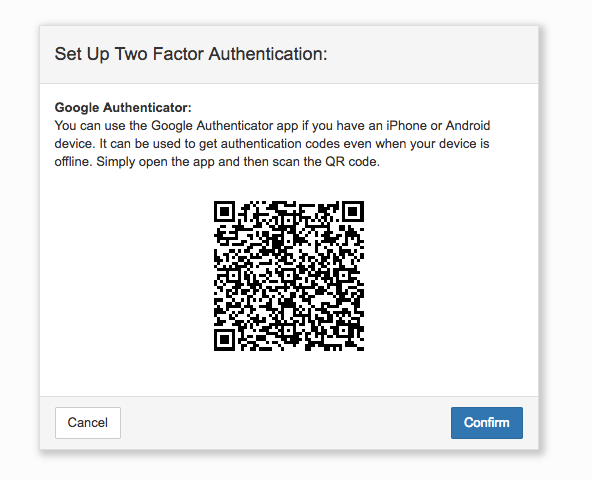
Once you have downloaded the Google Authenticator App, click the Google Authenticator App method. You will be taken to this screen with your own unique QR Code.
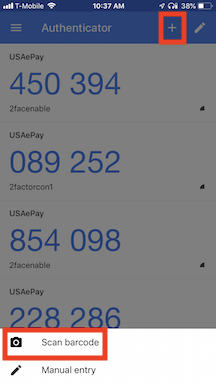
Open the app on your mobile device, tap the + at the top righthand corner of the screen and then select Scan Barcode
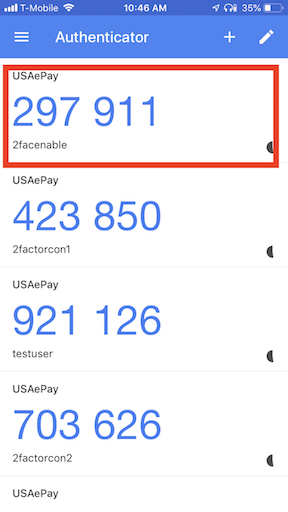
and the gateway user will be added to the user's app and a code will be shown and periodically refresh. This the the authentication code you will use when logging in:
Next you will need to enter the authentication code provided in the Google Authenticator app into the gateway to confirm the google authenticator app is set up correctly.
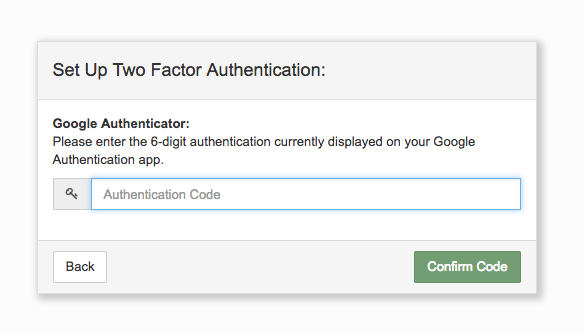
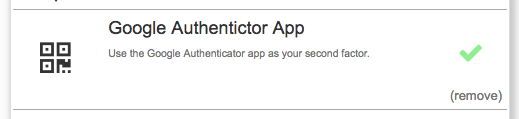
When the security code is confirmed, you will be returned to the Two Factor Set-Up screen and will see a green check to the right of the method.
An email will also be sent to the user email confirming an authentication method has been added.
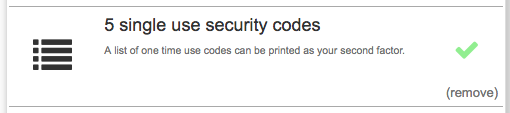
One Time Use Codes
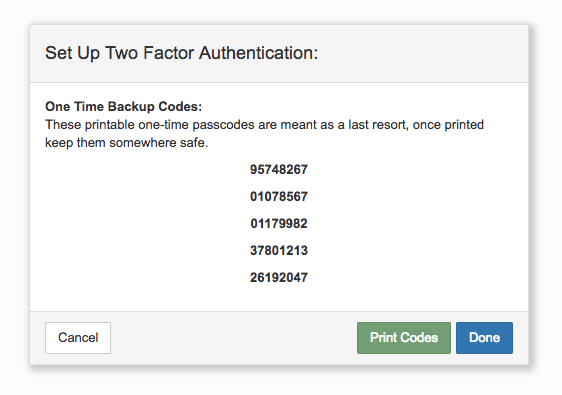
Click here to print off one time use codes as one of your authentication methods. These are meant to be used as a last resort and we do not recommend this is a default form of authentication. When you select this method you will see the following screen:
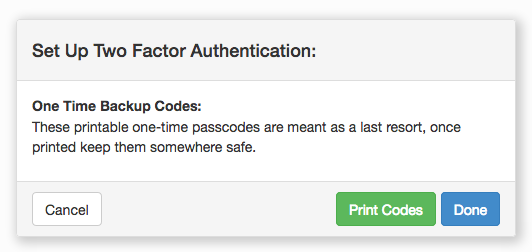
Click Print Codes to bring up an additional window showing the codes. When this page shows, you should also see a print dialogue window.
Once codes have been printed, click Done to return to the Two Factor set up screen. You will see a green check to the right of the method.
An email will also be sent to the user email confirming an authentication method has been added.
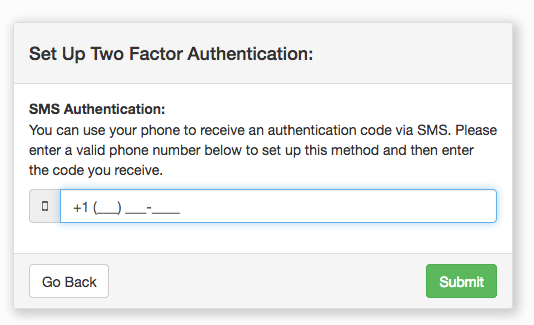
SMS Text Message
When you click SMS Text Message, You will see the following screen. Enter the phone number where you would like to receive the authentication code and click Submit.
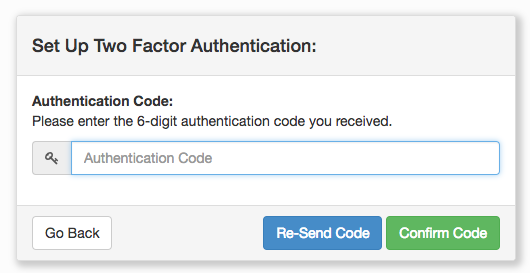
The gateway will send a text message to the mobile number you entered and provide the screen below to enter the code. Enter the code that you received via text and click Confirm. Click Resend Code if the code is not received.
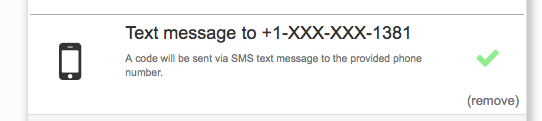
When the security code is confirmed, you will be returned to the Two Factor Set-Up screen and will see a green check to the right of the method, along with the last 4 digits of the phone number where the confirmation was sent.
An email will also be sent to the user email confirming an authentication method has been added.
Security Level
When you have selected your desired authentication methods, click Continue.
You will then see the screen below. Drag the square icon to the desired security level.
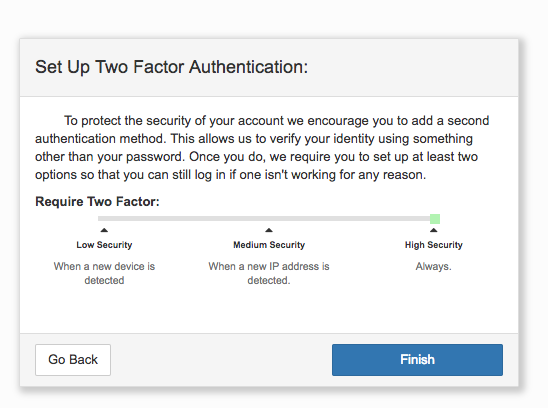
There are three security options:
- Low Security- Gateway will only prompt to verify two factors when logging into a new computer. Please Note: If you each browser is considered a device. If you login to a new browser on the same computer, you will have to verify two factors again.
- Medium Security- Gateway will prompt to verify two factors when logging into a new computer or on an IP you have not used before.
- High Security- Gateway will prompt to verify 2 factors for every session login. Please Note: A login session lasts 24 hours, so you will not have to verify 2 factors from the same computer and IP every 15 minutes.
Click Finish to complete two factor set up and return to the User Settings page.
Logging in with Two Factor
If your security level requires you to authenticate using a second factor, the gateway will automatically prompt you to verify your second factor. If you have more than one factor set up, the gateway will ask for the factor considered most secure. Listed below are all factors by security strength:
- U2F Security Key (Most Secure)
- Yubico OTP
- Google Authenticator
- One Time Use Codes
- SMS Text Message (Least Secure)
Logging in with U2F Security Key
To verify using the U2F security key, make sure it is plugged into your computer and press the authentication button.
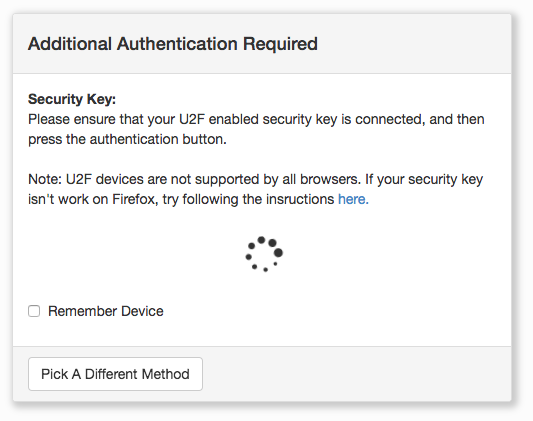
Check the Remember Device box to skip two factor authentication on this computer/browser combination if you have the security set to Medium or Low.
Click Pick a Different Method button to choose to verify a different method instead.
If you are logging into a new device, or registering a new device, then an email will be sent to the user email to confirm.
Logging in with Yubico OTP
To verify using the OTP security key, make sure it is plugged into your computer and press the authentication button.
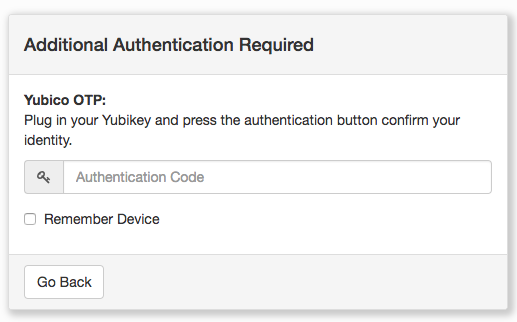
Check the Remember Device box to skip two factor authentication on this computer/browser combination if you have the security set to Medium or Low.
Click Go Back button to choose to verify a different method instead.
If you are logging into a new device, or registering a new device, then an email will be sent to the user email to confirm.
Logging in with Google Authenticator
To verify using the Google Authenticator app, open the app, enter the current code, and click Confirm.
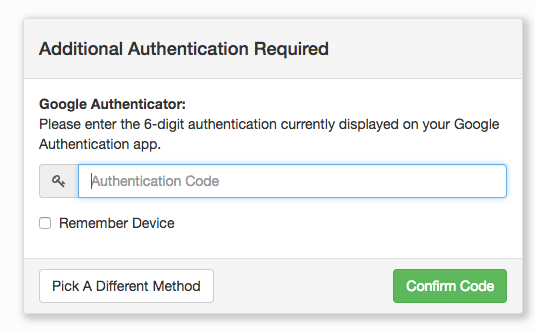
Check the Remember Device box to skip two factor authentication on this computer/browser combination if you have the security set to Medium or Low.
Click Pick a Different Method button to choose to verify a different method instead.
If you are logging into a new device, or registering a new device, then an email will be sent to the user email to confirm.
Logging in with One Time Use Codes
To verify using one time use codes, enter one of the codes you have printed, and click Confirm Code.
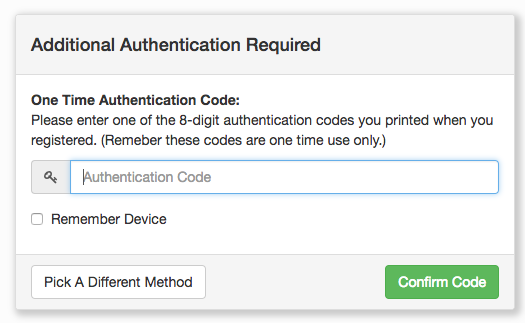
Check the Remember Device box to skip two factor authentication on this computer/browser combination if you have the security set to Medium or Low.
Please Note: Once you use this code to login, you will not be able to use it to verify your identity a second time. If you have used all 5 of the original codes, this method will not be listed when you select "Pick a Different Method". You will not be able to use this as a second factor until you generate additional codes.
Click Pick a Different Method button to choose to verify a different method instead.
If you are logging into a new device, or registering a new device, then an email will be sent to the user email to confirm.
Logging in with SMS Text Message
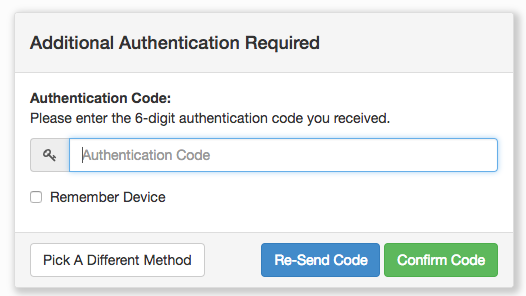
Check the Remember Device box to skip two factor authentication on this computer/browser combination if you have the security set to Medium or Low.
Click Pick a Different Method button to choose to verify a different method instead.
If you are logging into a new device, or registering a new device, then an email will be sent to the user email to confirm.
Updating your Two Factor Settings
Once you have set up your two step authentication, you may need to alter your settings after the fact. To update two factor authentication go to the user settings in upper righthand corner and click Account Settings.
Then click the "Manage Authentication Methods" button.
You will be prompted to verify using a second authentication method just like when you are logging into your account. Once you have verified the account, you will then see a menu with your two factor authentication settings.
Adding a New Method
If you would like to add a new factor, click on any of the methods that does not have the green checkmark on the right and you will be prompted through the configuration steps as described in the configuration above.
Removing a Method
If you would like to remove a method, simply click on the (remove) link on the righthand side of the method and confirm.
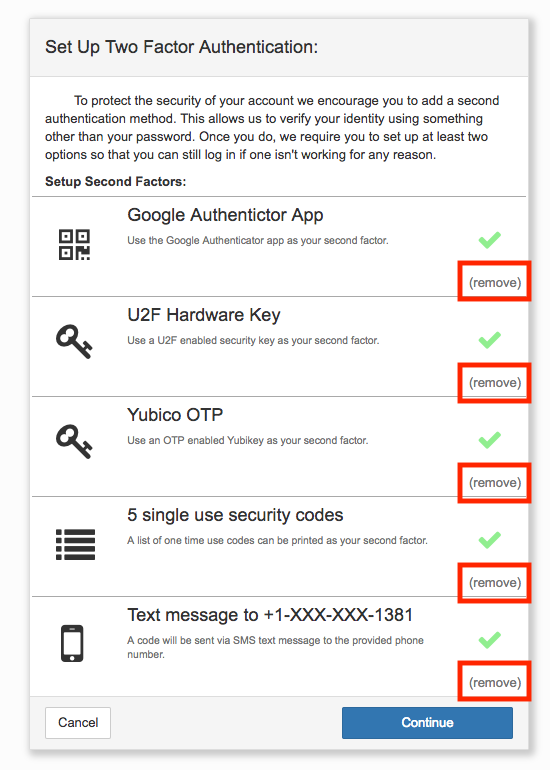
Please Note: If you have less than two methods, you will need to add another before you can click "Continue" to confirm your security level and save your Two Factor Authentication settings.
Updating Mobile Number
To update your mobile phone number for the SMS Text, remove the authentication method by clicking the Remove link and confirm.
Then click on the method again to re-add it with your new mobile number.
Please Note: You may only have one phone number on file at a time which you use to authenticate your account.
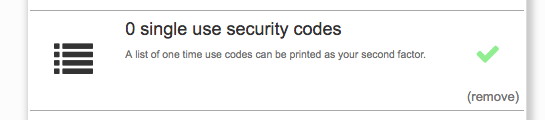
Generating Additional Printable Codes
Once you have used all of your one time use codes to verify your identity, the title of the method will read 0 single use security codes as shown in the image below. You will need to generate additional codes to be able to use this method again.
To generate additional codes for the One Time Use Codes method, remove the authentication method by clicking the Remove link and confirm.
Then click on the method again to re-add it and generate additional one time use codes.
Updating Security Level
To update the security on your two factor authentication, click Continue in method configuration screen.
You will then see the screen to update to security settings. When you have selected the desired security level click Finish to confirm and return to the User Settings page.
Disabling Two Factor
To disable two factor authentication completely, contact our customer support department for assistance.